Getting started with Pipeline
Before reading this document, Minic should be installed on your PC. If you didn’t install Minic, please take a look at the Installing Cocktail Mini.
Cocktail Cloud has feature of automating pipeline that is from code to deploy. Continuous Delivery is one of the key requirements in Cloud Native Computing. Because, that is related to agility of business. In the Cocktail Cloud, all the tasks of downloading code, building and deploying container are automated by pipeline. The Cocktail Cloud Pipeline ease the operator burden.
This document contains a brief demo of the Cocktail Cloud Pipeline features. The following steps describe how to that.
Starting Minic
- Run the
minic startcommand.$ minic start Kubernetes cluster started.(8s) Checking inspector...| - When all pods are running(green status), type “o” to run Cocktail Cloud on your browser.
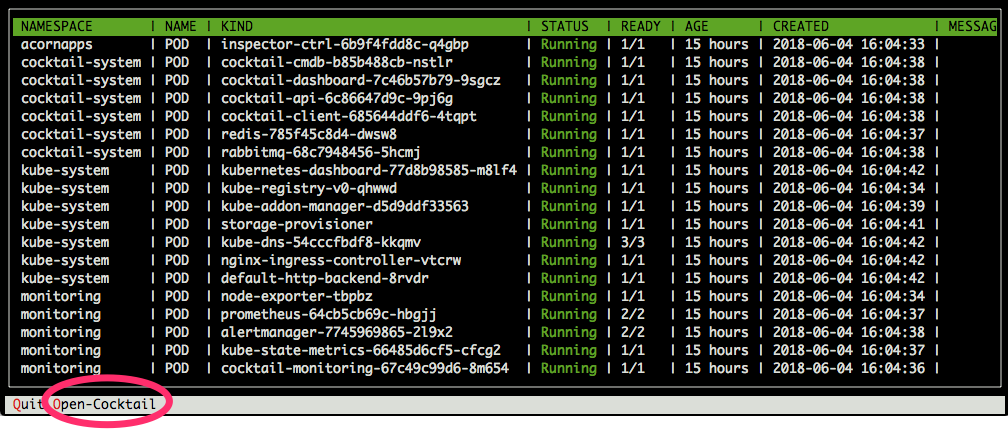
The status screen on your console(above image) shows the status of all pods that are running on local Kubernetes cluste(minic cluster). To exit the status screen, type “q” on your keyboard. You can see the screen by running minic status command at anytime you want.
Log in to Cocktail Mini
- At the Cocktail Mini’s login screen, select role and input user id, password.
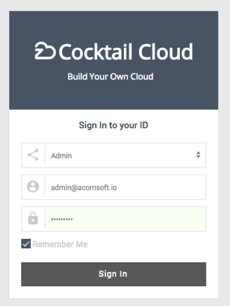
The default user informations are as follows.- Role : Admin
- User Id : admin@acornsoft.io
- Password : Admin0000
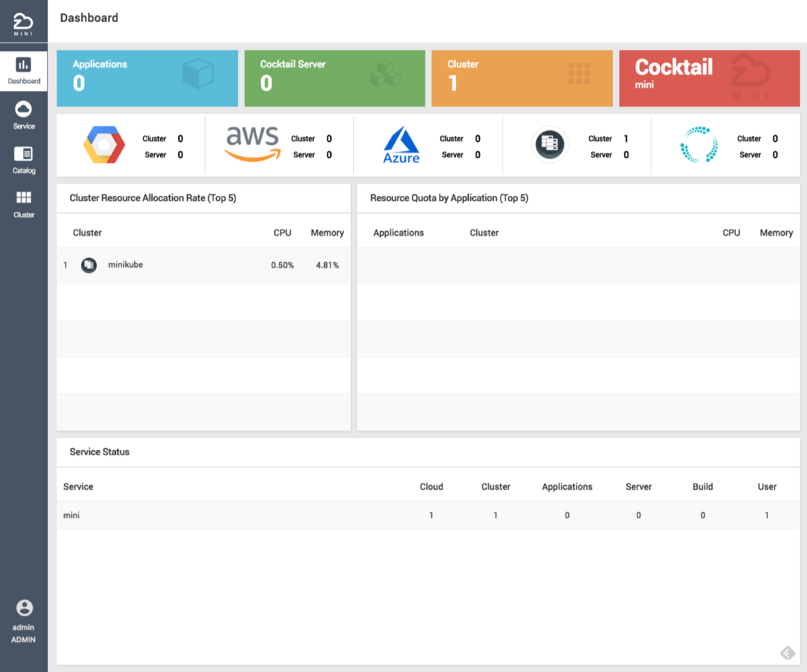
- Click “Sign in” button. You can see the Dashboard screen.
Create the Build
-
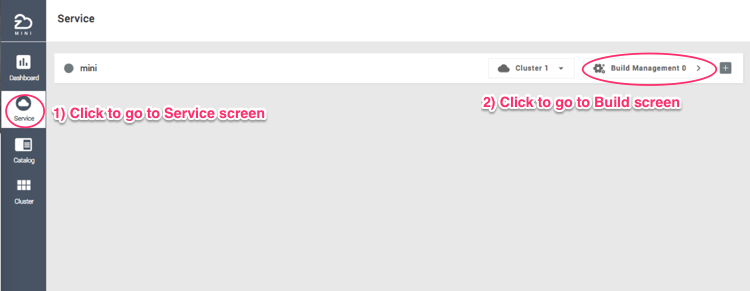
Click the “Service” menu on left side.
-
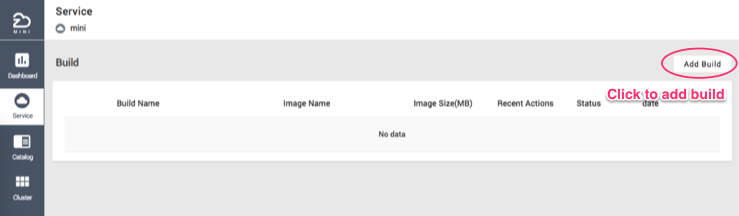
Click the “Build Management” button on service bar to go to the “Build” screen
-
At the build screen, click the ‘Add Build” button.
-
You can see the build screen as follows. Next steps are input the build information.
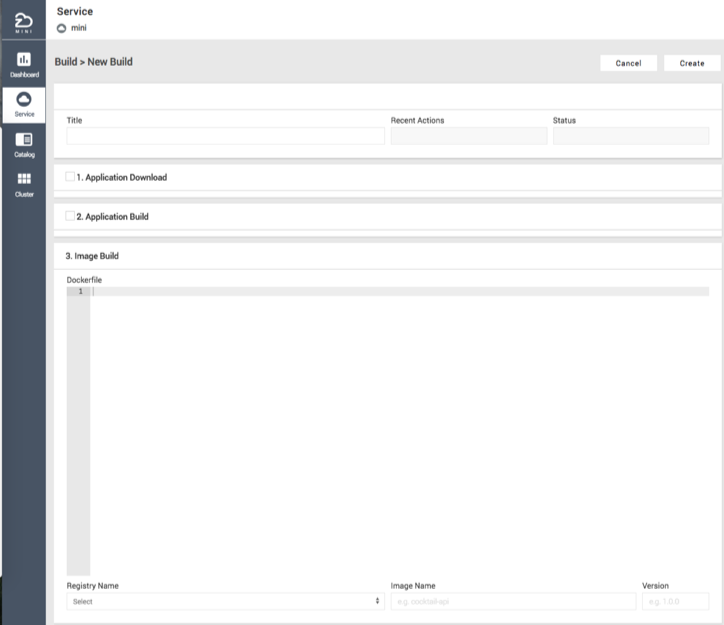
- Enter title(name) of build in the first group on the build screen.
- Title : “Hello Cocktail”

- Title : “Hello Cocktail”
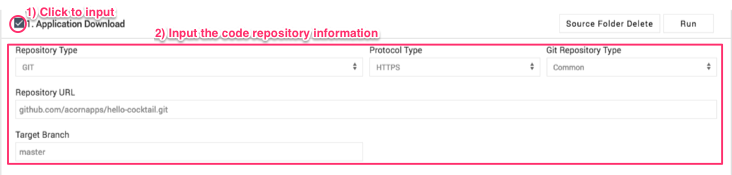
- Click checkbox of the “1. Application Download” group, then you can see the input form of code repository information. Enter the information of repository. (In this example, I used the Cocktail Mini’s public repository)
- Repository Type : GIT
- Protocol Type : HTTPS
- Git Repository Type : Common (this means that the repository is public)
- Repository URL : github.com/acornapps/hello-cocktail.git (you should omit “https://“ of the URL)
- Target Branch : master
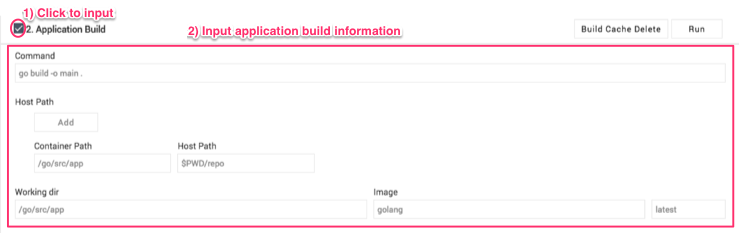
- Next, Click checkbox of the “2. Application Build” group to enter build information. In the Cocktail Cloud, container is used to run the task of build. You can change the container to what you want., like the language image, tag etc in any time.
- Command :
go build -o main. (This command run the golang container’s command) - Host Path - Container Path :
/go/src/app(This path map the “Host Path” into container) - Host Path - Host Path :
$PWD/repo(This path is where the code is downloaded) - Working dir :
/go/src/app(This is the current path where the command is executed) - Image : golang, latest (The official image of go language container with it’s tag)
- Command :
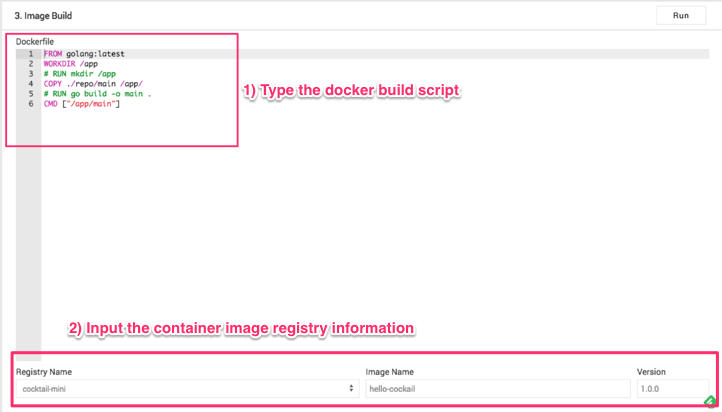
- On the group of “3. Image Build”, enter the build script of image that you will create. And enter the name of image registry, image and tag.
- Dockerfile :
FROM golang:latest WORKDIR /app # RUN mkdir /app COPY ./repo/main /app/ # RUN go build -o main . CMD ["/app/main"] - Registry Name : cocktail-mini
- Image Name : hello-cocktail
- Version : 1.0.0 (Image tag)
- Dockerfile :
- Click the “Create” button to create build.

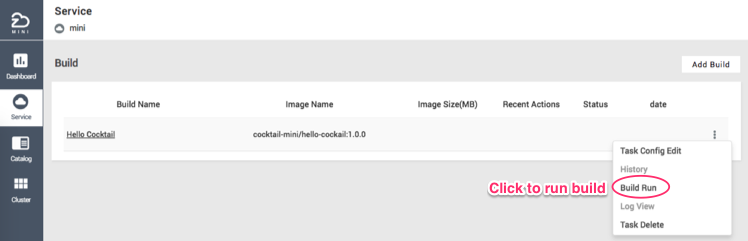
Run Build
-
To run the build, on the list of builds, click the action button that is in right side of build and select “Build Run”.
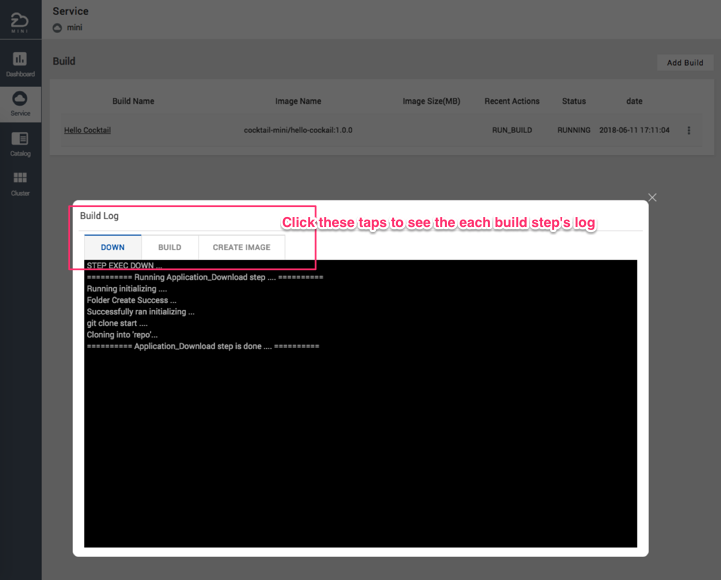
-
During the build process is running, you can see the build logs by clicking taps on the “Build log” dialog.
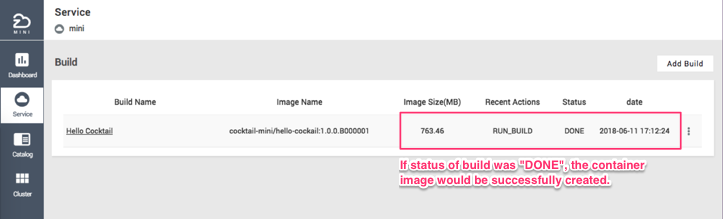
-
When build process was done, the status of build would be changed to “DONE”. (See below)
Create Server and Pipeline
Now, let’s create the pipeline with creating server
-
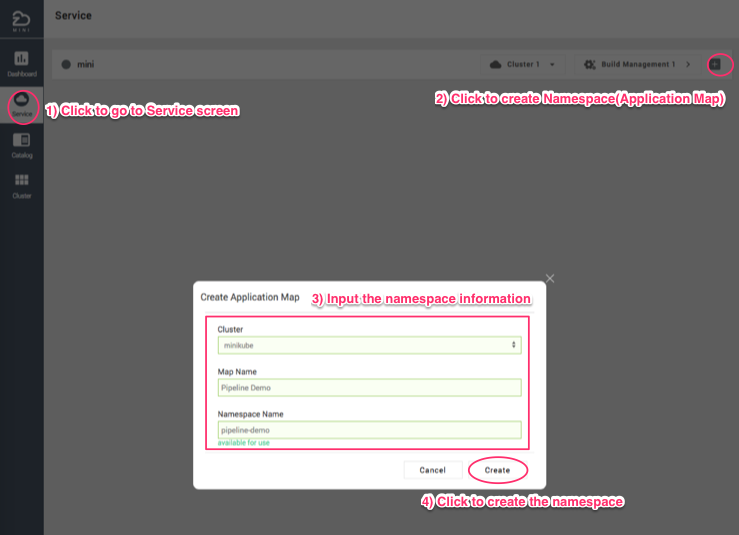
Click the “Service” menu.
-
Click the “+” button on service bar to create application map.
- Enter the information that is needed to create application map.
- Cluster : minikube
- Map Name : Pipeline Demo
- Namespace Name : pipeline-demo
-
Click the “Create” button.
-
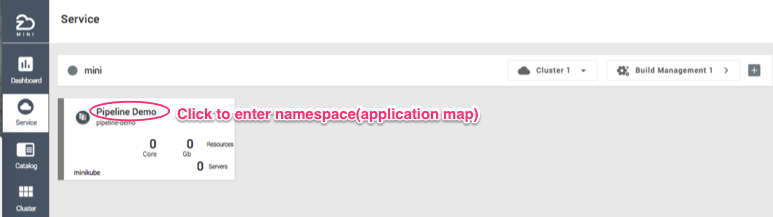
Click the application map, “Pipeline Demo”.
-
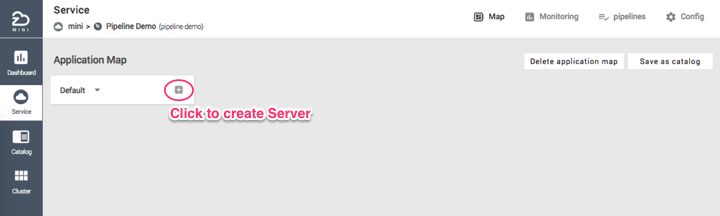
Click the “+” button to create server.
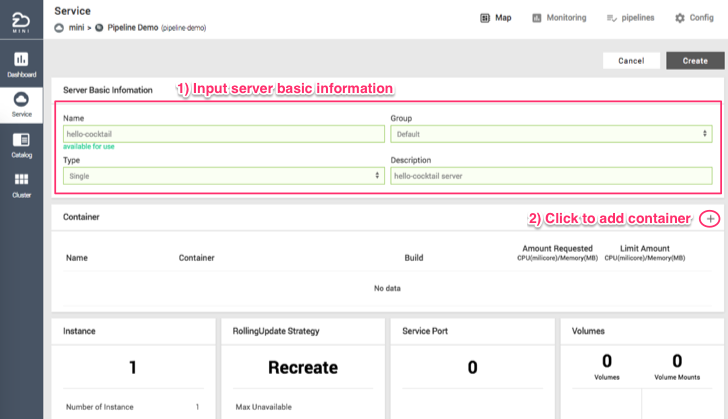
- In the server creating form, enter basic information of server.
- Name : hello-cocktail
- Group : default
- Type : Single
- Description : hello-cocktail server
-
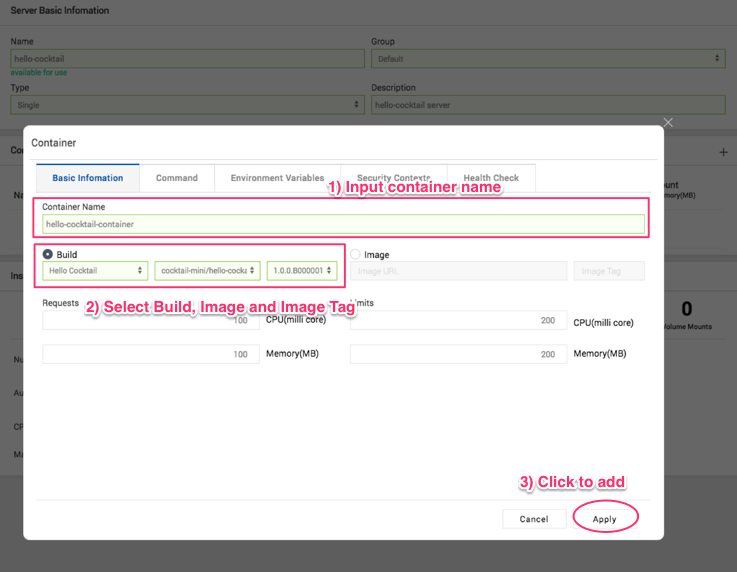
Click the “+” button to add container.
- In the container form, select the build information what you created before as a container image.
- Container Name : hello-cocktail-container
- Build
- Hello Cocktail : The name of build
- cocktail-mini/hello-cocktail : The name of build’s image
- 1.0.0.B0000001 : The tag of image. Build number is automatically assigned by Cocktail Cloud for automated pipeline process
-
Click the “Apply” button to add container.
-
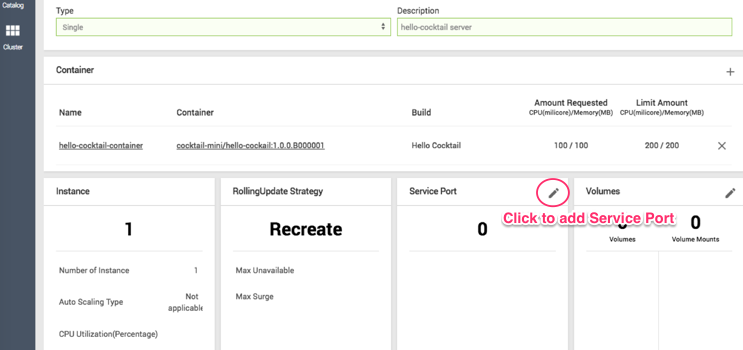
If you want to access the container from outside, you should to add “Service Port” to the container. Click the edit button to add service port.
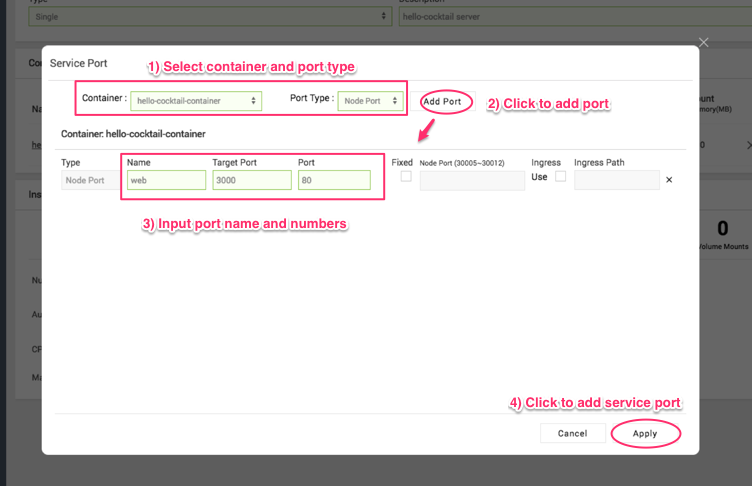
- Enter the information of Service Port.
- Container : hello-cocktail-container
- Port Type : Node Port
- Name : web
- Target Port : 3000(This is the container port that is exported)
- Port : 80 (This is server port that you can access from outside)
-
Click the “Apply” button to add Service Port
-
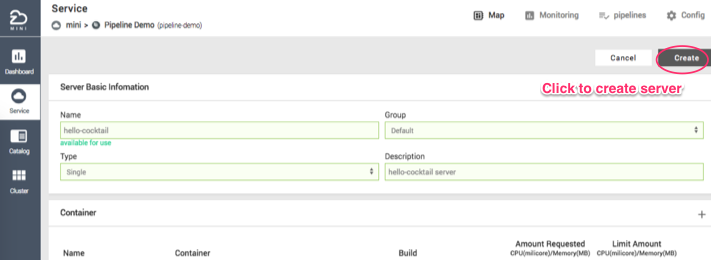
Click the “Create” button to create server.
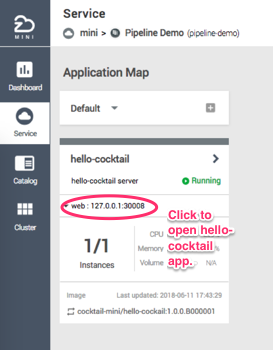
- The server was created. You can access that by clicking the Service Port address. (See below)
Run Pipeline
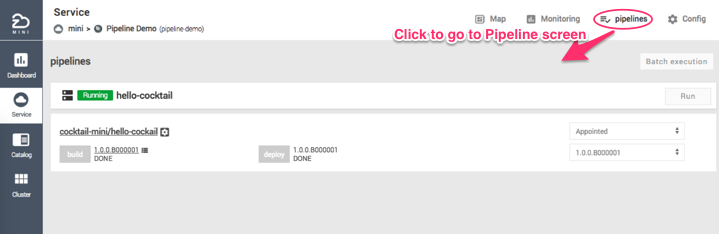
When you create server with build image, the Pipeline is automatically created. You can see the Pipeline on the “pipeline” tap of application map screen.
 If the code of build is updated, you can run the Pipeline to update the server.
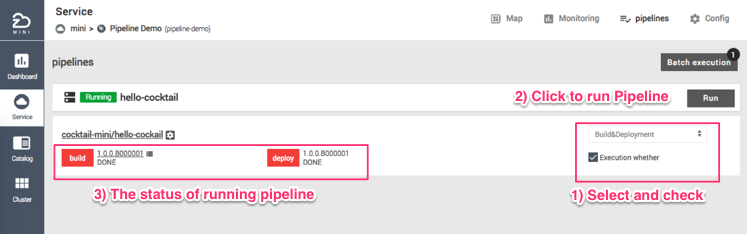
- Select type of run with “Build&Deployment” and check the “Execution whether” checkbox.
- Click the “Run” button of the Pipeline.
- You can see the status of running Pipeline
 The Pipeline of Cocktail Cloud automate process of build and deploy. So you can focus on your code with Cocktail Cloud Pipeline.